We stand at a unique juncture in the evolution of personal and professional golf simulation. The advent of sophisticated technology has transformed the once-complex and often manual operation of a golf studio into a streamlined, automated experience. This article, “Smart Studio 101: Automating Lights, Sound, and Launch Monitor,” delves into the methodologies and technologies that empower us to create a truly intelligent golf environment. Our objective is to guide you through the process of integrating these systems, offering a factual and comprehensive overview of the components, their functionalities, and the benefits of their synergistic operation. Consider this a blueprint for constructing a studio that responds to your presence and preferences, much like an orchestra conductor cues their musicians with a simple gesture.
Before we embark on the journey of automation, it is crucial that we, as builders and operators, possess a clear understanding of the fundamental elements that constitute our smart studio. These are the bricks and mortar upon which our automated edifice will stand.
Lighting: Setting the Scene for Optimal Performance
Lighting in a golf studio is not merely about illumination; it is about creating an environment conducive to accurate visual feedback and player comfort. We must consider both practical and atmospheric elements.
Types of Lighting Systems
- LED Strip Lighting: Offering versatility and energy efficiency, LED strips can be strategically placed to illuminate the hitting area, projection screen, and surrounding space. Their dimmable nature allows for precise control over light intensity.
- Recessed Lighting: Integrated into the ceiling, recessed lighting provides a clean, unobtrusive look while offering ample ambient light. We often choose fixtures with adjustable beam angles to direct light where it is most needed.
- Task Lighting: For specific areas like club racks or seating, focused task lighting ensures visibility without distracting from the main projection.
Dimmability and Color Temperature
- Dimmable Control: The ability to adjust light intensity is paramount. We find that varying light levels can enhance the perceived clarity of the projected image and reduce eye strain during extended sessions.
- Color Temperature (Kelvin): The color of light is measured in Kelvin (K). We typically aim for a neutral white light (4000-5000K) in the hitting zone to accurately represent ball flight and club data, avoiding warm or cool tones that can alter perception.
Audio: Immersing Ourselves in the Simulation
Sound is more than an accompaniment; it is an integral component of the immersive experience. From the satisfying thwack of a well-struck ball to ambient course sounds, our audio system must deliver clarity and depth.
Speaker Configuration
- Stereo vs. Surround Sound: While a basic stereo setup (two speakers) can provide adequate audio, we often advocate for a 2.1 or even 5.1 surround sound system. The subwoofer in a 2.1 system adds significant depth to impact sounds, while surround sound positions us directly within the simulated environment.
- Speaker Placement: Strategic placement is critical. Our front speakers are typically positioned to the left and right of the projection screen, while rear speakers are placed behind the hitting area. This creates a soundstage that envelops the player.
Audio Sources and Amplification
- Launch Monitor Integration: Most modern launch monitors offer audio output for impact sounds and voice prompts. We integrate this directly into our audio system.
- Media Playback: Additional audio sources, such as music streaming or instructional videos, require separate input channels on our amplifier or audio receiver.
- Amplification: A dedicated amplifier or AV receiver is essential to power our speakers and manage audio inputs. We consider amplifier wattage in relation to speaker impedance to ensure optimal performance without distortion.
Launch Monitor: The Brain of Our Operation
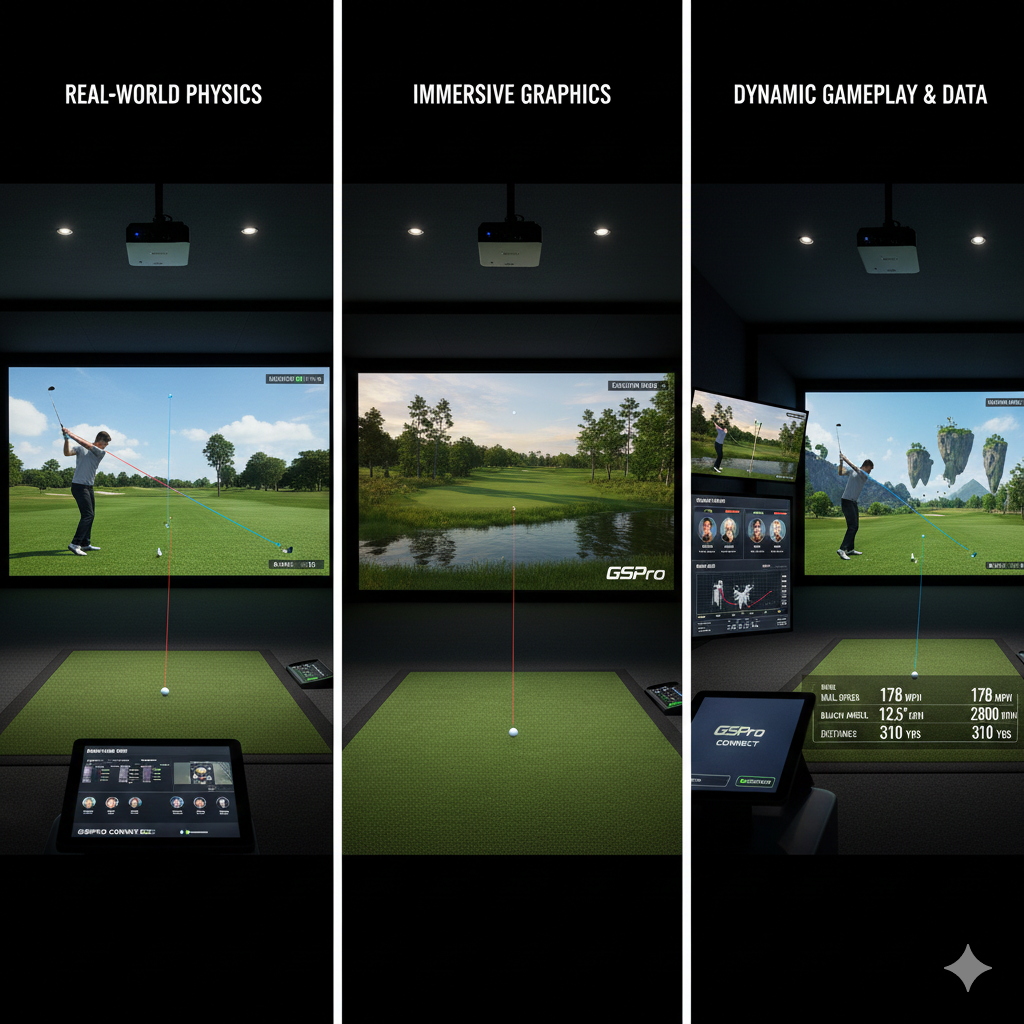
The launch monitor is the undisputed heart of our smart studio. It is the sophisticated sensor array that captures critical data—ball speed, club path, spin rates—and translates them into the virtual world.
Types of Launch Monitors
- Photometric Systems: These systems use high-speed cameras to capture images of the ball and club at impact. We find them to be highly accurate in well-lit environments.
- Doppler Radar Systems: Radar-based systems emit and receive microwave signals to track the ball’s trajectory. These are often more versatile for outdoor use but require more precise calibration indoors.
- Combined Systems: Some advanced launch monitors integrate both photometric and Doppler radar technologies, offering a hybrid approach that leverages the strengths of each.
Data Output and Software Integration
- API and SDK Access: For seamless automation, we prioritize launch monitors that offer robust Application Programming Interfaces (APIs) or Software Development Kits (SDKs). These allow us to programmatically access and interpret data.
- Simulation Software: The launch monitor integrates with golf simulation software (e.g., GSPro, E6 Connect). This software visualizes the ball flight and provides us with a virtual course or driving range.
In addition to exploring the automation of lights, sound, and launch monitors in Smart Studio 101, readers may find it beneficial to consider the financial implications of their equipment choices. A related article titled “Simulator vs. Launch Monitor: Which is the Better Investment for Game Improvement?” provides valuable insights into the advantages and disadvantages of each option. This can help golfers make informed decisions about their investments in technology to enhance their training experience. For more information, check out the article here: Simulator vs. Launch Monitor.
Orchestrating the Experience: Automation Strategies
With our core components understood, we can now turn our attention to the art of automation. Our goal is to create a studio that anticipates our needs and responds intelligently, much like a well-trained assistant.
Centralized Control Systems
The cornerstone of our automation strategy is a centralized control system. This serves as the brain that coordinates the actions of all our smart devices.
Home Automation Hubs
- SmartThings, Hubitat, Homey: These hubs act as intermediaries, connecting various smart devices (lights, switches, sensors) from different manufacturers and enabling them to communicate with each another. We often prefer platforms with strong local processing capabilities for enhanced reliability and privacy.
- Integration with Voice Assistants: While not strictly automation, voice assistants (e.g., Amazon Alexa, Google Assistant) can be integrated with our hubs to provide convenient voice control over our studio environment. This offers an intuitive interface for tasks like “Dim the lights” or “Start a round.”
Custom Control Software
- Python Scripts: For advanced users, Python offers a powerful and flexible platform for developing custom automation scripts. We can write code to directly interact with device APIs, create complex logical sequences, and integrate with our launch monitor’s data.
- Node-RED: This open-source flow-based programming tool is excellent for building event-driven automation. We find its visual interface intuitive for linking devices and creating conditional actions.
Automated Lighting Sequences
The transition from a dormant studio to an active playing environment should be seamless and automatic.
Entrance Detection
- Motion Sensors: We deploy motion sensors at the studio entrance. Upon detecting our presence, the system can automatically power on the primary lights to a pre-defined level, creating an inviting atmosphere.
- Door Sensors: Magnetic door sensors can also be used to trigger lighting sequences when the studio door is opened.
Activity-Based Lighting
- Launch Monitor Activation: When the launch monitor is powered on and actively tracking shots, our lighting system can automatically adjust to optimal playing conditions. This might involve dimming ambient lights and increasing illumination in the hitting zone.
- Pause and Resume: If we pause our simulation, the lights could subtly shift to a more relaxed setting, then return to play mode when we resume.
Shutdown Procedures
- Timer-Based Off: After a period of inactivity (e.g., 30 minutes with no shots detected), the system can progressively dim and then switch off all lights, conserving energy.
- Manual Override: We always ensure a manual override is available, allowing us to explicitly control lighting regardless of automated states.
Intelligent Audio Management
Our audio system should complement our actions, providing context-aware soundscapes.
Launch Monitor Triggered Sounds
- Impact Sounds: The most fundamental automation here is the direct integration of the launch monitor’s impact sounds with our studio’s audio system. This ensures that every virtual shot has a corresponding, visceral audio feedback.
- Voice Prompts and Feedback: If our launch monitor or simulation software provides spoken feedback (e.g., “Good shot,” “Next hole”), we ensure these are routed through our primary audio system with appropriate volume levels.
Environmental Audio and Ambiance
- Background Music Integration: We can configure our system to automatically play background music when the studio is active but no shots are being taken, or when we are browsing menus. We can even link music genres to specific simulation courses.
- Ambient Course Sounds: Some simulation software offers ambient course sounds (e.g., birds chirping, wind blowing). We integrate these to enhance the immersion, ensuring they blend seamlessly with impact sounds.
Volume Control and Muting
- Activity-Based Volume: During intense playing sessions, we may prefer louder impact sounds and minimal background music. During practice, we might favor lower volumes. Our automation system can adjust these based on the activity type selected in the simulation software.
- Automatic Muting: If a phone call or other external audio input is detected, our system could temporarily mute or lower the studio audio to allow for conversations without interruption.
Integrating the Launch Monitor with Our Smart Ecosystem

The real power of a smart studio emerges when our launch monitor, the data beacon, becomes an active participant in our automation routines.
Data-Driven Automation
Our launch monitor generates a wealth of data. We can leverage this data to trigger a variety of automated actions.
Shot Validation and Feedback
- Projection Screen Control: Certain launch monitors can trigger events based on shot validation. For instance, after a registered shot, the main projection could briefly display a summary of the shot metrics (distance, carry, spin) before returning to the course view.
- Visual Cues: We can use LED strip lighting to provide visual feedback. A green flash for a good shot, or a red flash for a shank, can offer immediate, non-intrusive feedback.
Practice Session Management
- Automatic Data Logging: As we hit shots, the launch monitor logs data. We can automate the process of saving these sessions to a cloud storage service or local database, eliminating manual data entry.
- Session Start/End: The act of starting or ending a practice session in the simulation software can trigger automation. For example, ending a session could initiate the studio shutdown sequence for lights and audio.
Advanced Interoperability
Beyond simple triggers, we seek deeper integration, fostering a truly intelligent environment.
API/SDK Utilization
- Custom User Interfaces: With access to the launch monitor’s API, we can develop custom user interfaces that consolidate control of the studio. Imagine a single tablet app that allows us to select a course, adjust lighting, and monitor launch data simultaneously.
- Data Visualization on Secondary Displays: We can push real-time launch data to secondary displays (e.g., a small monitor next to the hitting mat) for immediate review, independent of the main projection.
Feedback Loop Optimization
- Adaptive Studio Settings: Over time, as our system gathers data on our preferences and playing habits, it can begin to adapt. For instance, if we consistently prefer a certain lighting level for chipping practice, the system can learn and automatically apply that setting when it detects a chipping selection in the simulation.
- Error Detection and Alerts: If the launch monitor detects an anomaly (e.g., a calibration issue, a sensor blockage), our automation system can trigger an alert (e.g., a flashing light, an audible chime) to notify us.
The Human Element: Configuration, Maintenance, and Security

While automation strives for autonomy, we, as operators, remain essential. Our role shifts from manual control to intelligent oversight.
Initial Configuration and Calibration
- Device Pairing: Each smart device must be correctly paired with our central control system. We meticulously follow manufacturer instructions for this critical step.
- Sensor Calibration: Launch monitors, especially photometric systems, require careful calibration to ensure accurate data capture. This often involves specific target placements and illumination adjustments. We treat calibration as a foundational process, not an afterthought.
Ongoing Maintenance and Updates
- Software Updates: Regular updates for our control hub, smart devices, and launch monitor software are paramount for security, performance, and access to new features. We schedule these updates strategically, often during periods of inactivity.
- Hardware Inspection: Periodically, we inspect our physical hardware (cables, sensors, lights) for any signs of wear or malfunction. Proactive maintenance prevents costly downtime.
Network Security and Privacy
- Strong Passwords: All network-connected devices and accounts require strong, unique passwords. This is our first line of defense against unauthorized access.
- Dedicated Network Segment: For heightened security, we may consider isolating our smart studio devices on a separate VLAN (Virtual Local Area Network) to prevent potential security breaches from affecting our main home or office network.
- Privacy Settings: We carefully review the privacy settings of all smart devices and cloud services, understanding what data is collected and how it is used. Our data is our own, and we must safeguard it.
In the realm of enhancing your golf practice experience, Smart Studio 101: Automating Lights, Sound, and Launch Monitor serves as a valuable resource for those looking to optimize their training environment. For further insights on creating an effective home practice culture and maintaining consistency in your routine, you might find this article particularly helpful. It offers practical tips that can complement the automation strategies discussed in Smart Studio 101. To read more, check out this article.
The Future of Our Smart Studio
| Feature | Description | Automation Level | Typical Setup Time | Benefits |
|---|---|---|---|---|
| Lighting Control | Automated adjustment of studio lights based on time of day and activity | High | 15 minutes | Consistent lighting, energy savings, enhanced video quality |
| Sound Automation | Automatic sound mixing and volume adjustment for microphones and background music | Medium | 20 minutes | Improved audio clarity, reduced manual intervention |
| Launch Monitor Integration | Automated data capture and display from launch monitors for sports analysis | High | 30 minutes | Real-time feedback, enhanced training efficiency |
| System Synchronization | Coordinated control of lights, sound, and launch monitor via central software | High | 10 minutes | Streamlined operation, reduced setup complexity |
| Remote Control | Ability to control all systems remotely via mobile or desktop app | Medium | 5 minutes | Convenience, flexibility in studio management |
The journey of automation is continuous. As technology advances, so too will the capabilities of our smart studios. We envision a future where our studios not only respond to us but anticipate our needs with even greater precision.
We are building more than just a golf simulator; we are constructing a dynamic, interactive environment that adapts to our every swing, our every preference, and our every training goal. By embracing the principles outlined in “Smart Studio 101: Automating Lights, Sound, and Launch Monitor,” we empower ourselves to create the ultimate personalized golf experience, a true extension of our golfing aspirations. This is not simply about convenience; it is about optimizing our practice, enhancing our enjoyment, and elevating our game. We are the architects of this intelligent space, and its potential is limited only by our imagination and our willingness to innovate.
FAQs
What is Smart Studio 101?
Smart Studio 101 is a guide or system designed to help users automate various studio components such as lights, sound, and launch monitors, enhancing efficiency and control during recording or broadcasting sessions.
How can I automate the lighting in my studio using Smart Studio 101?
Smart Studio 101 typically involves using smart lighting systems that can be programmed or controlled remotely. This may include setting schedules, adjusting brightness and color, or syncing lights with other studio activities through automation software or smart home devices.
What types of sound automation are covered in Smart Studio 101?
The sound automation aspects include controlling audio levels, managing microphones, integrating sound effects, and automating mixing processes. This can be achieved through digital audio workstations (DAWs), smart mixers, or software that allows preset configurations and real-time adjustments.
What is a launch monitor, and how is it automated in a smart studio setup?
A launch monitor is a device used to track and analyze the performance of sports equipment, commonly in golf or baseball. In a smart studio, automation can involve syncing the launch monitor data with recording equipment, triggering cameras or lights based on activity, and integrating the data into live streams or recordings.
What are the benefits of automating lights, sound, and launch monitors in a studio?
Automating these elements improves workflow efficiency, reduces manual intervention, ensures consistent quality, and allows for more creative control. It also enables seamless integration of various studio components, enhancing the overall production value and user experience.